

₨350
A Sickle Scaler is one of the most widely used supragingival scaling instruments in dental hygiene and periodontal practice. Dental hygienists, periodontists, and general practitioners rely on this instrument to remove calculus deposits, plaque, and stain from tooth surfaces at and above the gingival margin — making it a fundamental component of every periodontal maintenance and preventive dental appointment. Because effective supragingival scaling directly determines the success of periodontal therapy and routine prophylaxis, the sickle scaler dental instrument remains indispensable in every scaling instrument tray worldwide.
In addition to calculus removal, this instrument plays a critical preventive role — disrupting the mineralised deposits that drive gingival inflammation and periodontal disease progression before they extend subgingivally and require more invasive treatment. As a result, consistent use of the correct sickle scaler design at every scaling appointment significantly reduces the clinical burden of periodontal disease management for both patient and clinician.
A sickle scaler dental instrument is a hand-operated periodontal instrument with a triangular cross-section blade, two cutting edges, and a sharp pointed tip — designed specifically for removing supragingival calculus from interproximal tooth surfaces, smooth enamel faces, and at the gingival margin. The blade cross-section distinguishes the sickle scaler from curettes — the sickle carries a triangular profile with two cutting edges meeting at a pointed tip, while curettes carry a rounded toe with a semi-circular cross-section suited for subgingival work.
The sickle scaler dental instrument works through a pull stroke — the clinician places the blade at a working angulation of 45–90 degrees against the tooth surface, engages the calculus deposit with the cutting edge, and applies a firm pull stroke in a coronal direction to fracture and dislodge the deposit from the tooth surface. Therefore, correct blade angulation against the tooth is the single most important technical variable determining whether the sickle removes calculus cleanly or slides over it without engaging the deposit effectively.
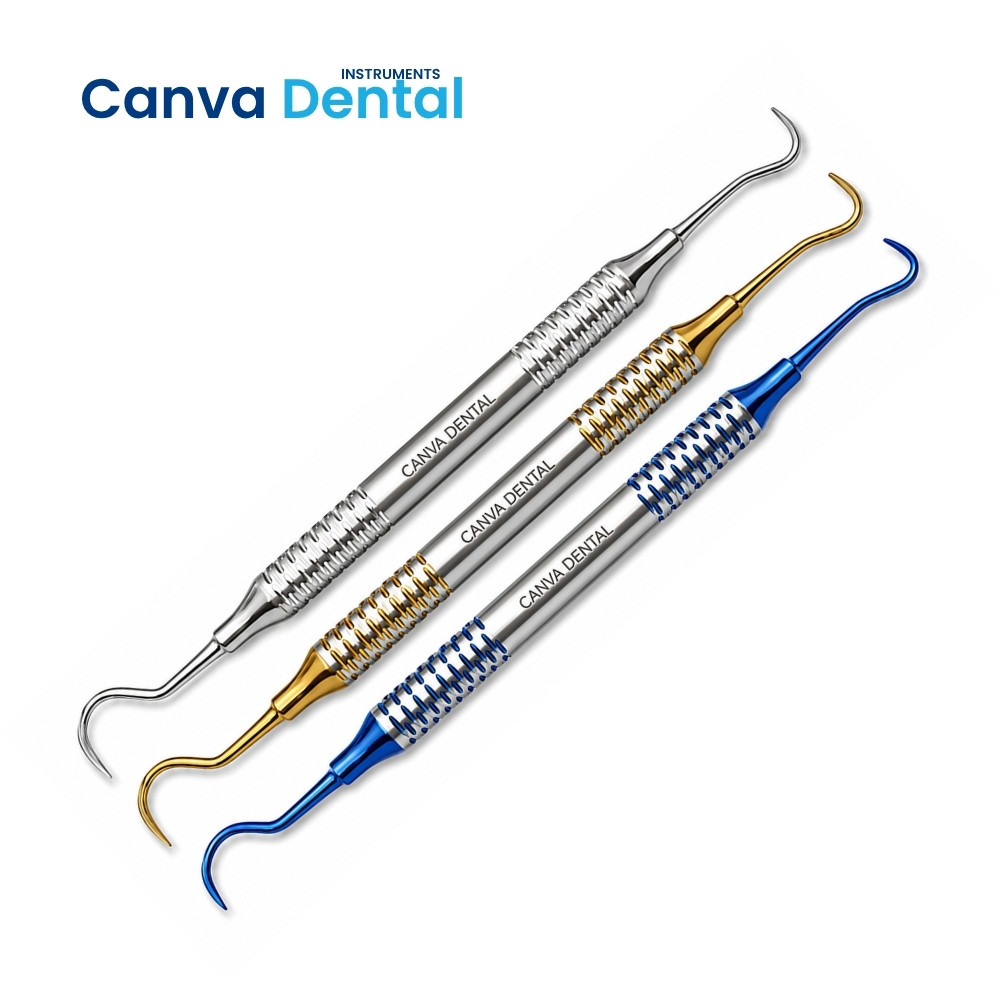
Understanding sickle scaler parts helps dental students and clinicians identify how each component contributes to clinical performance and apply the instrument with correct technique. Every sickle scaler dental instrument consists of the following main parts:
| Part | Location | Function |
|---|---|---|
| Handle | Outer gripping surface | Provides the clinician’s finger rest — knurled, hexagonal, or smooth designs suit different grip preferences |
| Shank | Between handle and blade | Connects handle to working end — straight shanks for anterior teeth, angled shanks for posterior access |
| Lower Shank | Terminal section of shank adjacent to blade | The angulation reference for correct working position — lower shank parallel to long axis of tooth indicates correct blade angulation |
| Blade | Working end of the instrument | Carries the two cutting edges that engage and remove calculus — triangular cross-section with flat face |
| Cutting Edges | Two lateral edges of the blade | Sharp metal edges that fracture calculus from tooth surface during pull stroke application |
| Pointed Tip | Terminal apex of the blade | Allows access into tight interproximal contact areas — the defining feature distinguishing sickle from curette design |
| Face | Flat surface between cutting edges | The reference surface for working angulation — positioned at 45–90 degrees to the tooth surface during calculus removal |
| Back | Convex outer surface of blade | Opposite the face — contacts the clinician’s finger during adaptation and provides orientation reference |
Each sickle scaler in our range delivers the blade sharpness, handle balance, and clinical durability that intensive periodontal scaling practice demands:
Several sickle scaler types exist, each designed for specific tooth positions, calculus locations, and access requirements. Understanding the available types helps clinicians build a complete periodontal scaling tray that addresses every calculus presentation across the full dental arch:
| Type | Shank Design | Access Area | Best For |
|---|---|---|---|
| Anterior Sickle Scaler | Straight shank | Anterior teeth — buccal and lingual surfaces | Calculus removal on incisors, canines, direct-access surfaces |
| Posterior Sickle Scaler | Contra-angle or curved shank | Posterior teeth — premolars and molars | Buccal, lingual, and interproximal calculus on posterior teeth |
| Universal Sickle Scaler | Moderate curve — all areas | Full arch — anterior and posterior | General-purpose scaling — single instrument for routine prophylaxis |
| Named Design | Distinguishing Feature | Primary Application |
|---|---|---|
| Jacquette Scaler (J1/J2) | Curved blade with offset tip — straight and curved variants | Anterior supragingival calculus — most commonly used anterior sickle |
| Morse Scaler (0/00) | Angulated shank for posterior access | Posterior supragingival interproximal calculus |
| Shepherd Hook Scaler | Hooked tip — extended pointed design | Tight interproximal contacts, calculus under contact points |
| Indiana University Scaler | Heavy blade — both mesial and distal access | Heavy calculus — anterior and posterior |
| H6/H7 Scaler | Modified shank angle — universal access | Universal anterior and posterior supragingival scaling |
Understanding the full range of sickle scaler uses helps dental teams apply this instrument most effectively across different clinical scenarios. Although supragingival interproximal calculus removal is the primary application, sickle scaler uses extend across several preventive, periodontal, and clinical maintenance situations:
The triangular cross-section of the sickle scaler dental blade is not merely a design preference — it is a fundamental anatomical feature that determines where and how effectively the instrument removes calculus from tooth surfaces.
Because the triangular cross-section creates two lateral cutting edges meeting at a pointed tip, the sickle scaler provides bilateral cutting capability from a single instrument position — the clinician can engage calculus on either the mesial or distal aspect of the contact area without repositioning the blade significantly. Furthermore, the pointed tip allows the instrument to penetrate tight interproximal contacts — areas where calculus forms earliest and builds most densely — that rounded-toe curettes cannot access as precisely.
However, this same pointed tip makes the sickle scaler contraindicated for subgingival use. In addition, inserting the pointed tip below the free gingival margin risks soft tissue laceration and perforation of the sulcular epithelium — injuries that cause patient discomfort and procedural bleeding without achieving any additional calculus removal in the subgingival zone where curette design is specifically required.
The flat face between the two cutting edges provides a clear angulation reference that helps clinicians maintain the correct 45–90 degree working angle during scaling strokes. When the face sits below 45 degrees to the tooth surface, the blade slides over calculus rather than engaging it — a condition called burnishing that compresses calculus against the tooth surface instead of removing it. Conversely, positioning the face beyond 90 degrees creates a scraping action that removes minimal deposit and generates excessive lateral pressure against the gingival tissue. Therefore, maintaining face angulation between 60 and 80 degrees consistently produces the most effective calculus fracture and removal with each stroke.
The most important comparison in periodontal instrument selection is the distinction between the sickle scaler dental instrument and the periodontal curette. Understanding this difference prevents the most serious scaling technique error — using the wrong instrument in the wrong anatomical zone:
| Feature | Sickle Scaler | Periodontal Curette |
|---|---|---|
| Cross-section | Triangular | Semi-circular |
| Cutting edges | Two — both lateral edges | Two — but only one used at a time |
| Tip design | Sharp pointed tip | Rounded toe — no point |
| Working zone | Supragingival only | Supragingival and subgingival |
| Subgingival safety | Contraindicated — pointed tip lacerates | Safe — rounded toe designed for pocket use |
| Calculus type addressed | Supragingival and margin deposits | Subgingival calculus and root surface |
| Named examples | Jacquette, Morse, H6/H7, Shepherd Hook | Gracey 1-2 through 17-18, Columbia, McCall |
Therefore, the correct clinical protocol uses the sickle scaler for all supragingival and marginal calculus first — removing accessible deposits efficiently with the two cutting edges and pointed tip — then transitions to curettes for subgingival instrumentation in areas of pocket formation. Using the sickle subgingivally at any point in this sequence risks tissue trauma without additional therapeutic benefit.
Clinicians hold the sickle scaler in a modified pen grasp — thumb, index finger, and middle finger on the handle, with the ring finger as the intraoral fulcrum resting on a stable tooth near the working area. This three-point contact between the instrument, the clinician’s hand, and the fulcrum tooth provides the controlled stroke delivery that prevents instrument slippage and unintended tissue contact during calculus removal.
Before applying the first stroke, adapt the lower third of the blade to the tooth surface — confirming the face sits at approximately 70 degrees — and establish firm fulcrum contact. In addition, confirming that the lower shank runs parallel to the tooth’s long axis at this point verifies correct working angulation without requiring direct visual assessment of the blade face during the procedure.
Apply scaling strokes in a short, firm, overlapping pull sequence — each stroke moving coronally from just below the deposit to just above the gingival margin. Overlapping strokes prevent skipping sections of tooth surface and ensure complete deposit removal across the entire calculus distribution. Moreover, working systematically from the mesial line angle to the distal line angle of each tooth — rather than random stroke placement — covers all surfaces predictably without leaving residual calculus between stroke paths.
All stainless steel sickle scalers in our range withstand repeated autoclave cycles at 134°C. However, blade sharpness requires active maintenance between sterilization cycles because a dull sickle scaler burnishes calculus rather than removing it — pressing deposits against the tooth surface and making subsequent removal significantly more difficult. Therefore, testing the cutting edge against an acrylic test stick before each appointment confirms whether the blade catches (sharp) or slides (dull) — a two-second test that prevents an entire appointment of ineffective scaling technique.
In addition, ultrasonic cleaning before autoclaving removes calculus dust, blood, and organic debris from the blade edges and shank surfaces effectively — preserving cutting edge sharpness and ensuring complete sterilization penetration to all instrument surfaces. Furthermore, sharpening dull sickle scaler cutting edges with an Arkansas or ceramic sharpening stone — maintaining the original triangular cross-section geometry — restores clinical performance and extends instrument working life considerably beyond what disposable alternatives provide.
Similarly, many orthodontists follow sterilization and hygiene guidance shared by the American Dental Association regarding patient safety and proper instrument maintenance practices.
We supply sickle scalers — including Jacquette, Morse, H6/H7, Shepherd Hook, and Indiana University designs in anterior, posterior, and universal shank configurations — to dental clinics, periodontal practices, dental hygiene departments, teaching hospitals, and instrument distributors across Lahore, Karachi, Islamabad, Multan, Peshawar, Faisalabad, Rawalpindi, and all major cities in Pakistan. Moreover, our institutional supply team handles bulk procurement for dental college periodontal departments and hospital dental units at competitive pricing.
Contact our team for current sickle scaler pricing in Pakistan, available designs, and delivery timelines for your clinic or institution.
Q: What is a sickle scaler used for in dentistry?
A sickle scaler removes supragingival calculus, plaque, and stain from tooth surfaces at and above the gingival margin. Primary sickle scaler uses include interproximal calculus removal using the pointed tip in tight contact areas, anterior and posterior supragingival scaling during prophylaxis appointments, gingival margin calculus debridement before subgingival curette instrumentation, extrinsic stain removal, and pre-restorative tooth surface cleaning before impression taking and adhesive procedures.
Q: What are the different sickle scaler types?
Sickle scaler types divide by shank design into anterior scalers with straight shanks for direct-access surfaces, posterior scalers with contra-angle shanks for premolar and molar access, and universal designs for full-arch use. Named designs include the Jacquette scaler for anterior supragingival work, the Morse scaler for posterior interproximal access, the Shepherd Hook for tight contact area calculus, the Indiana University scaler for heavy calculus, and the H6/H7 for universal anterior-posterior application. Each type addresses specific access requirements that other designs cannot reach as effectively.
Q: What are the main parts of a sickle scaler dental instrument?
The main sickle scaler parts include the handle for clinician grip, the shank connecting handle to working end, the lower shank section used as the angulation reference, the triangular blade carrying two cutting edges, the sharp pointed tip for interproximal access, the flat face positioned at 45–90 degrees to the tooth during calculus removal.
Q: What is the difference between a sickle scaler and a curette?
The sickle scaler dental instrument carries a triangular cross-section with two cutting edges and a sharp pointed tip — designed exclusively for supragingival calculus removal above the gingival margin.
Q: Can a sickle scaler be used subgingivally?
No. Using a sickle scaler below the free gingival margin is contraindicated in all clinical situations. The sharp pointed tip that makes this instrument effective for supragingival interproximal access becomes a tissue hazard subgingivally.
For complete clinical setups, explore all dental instruments here: CLICK
Reviews
There are no reviews yet.