

₨1,100
Package Includes: 2 pieces
The Cryer Elevator is one of the most widely used surgical instruments in oral extraction procedures. Oral surgeons, general dentists, and dental residents use this instrument to elevate, loosen, and remove retained roots, fractured root tips, and posterior teeth where root curvature and inter-radicular anatomy demand a specifically shaped working tip. Because controlled root elevation directly determines whether an extraction proceeds smoothly or results in root fracture, displacement, or socket wall damage, clinicians rely on the Cryer Elevator as an essential component of every extraction tray.
Furthermore, the Cryer Elevator dental design addresses a surgical challenge that straight elevators and luxators cannot solve efficiently — accessing the inter-radicular septum between bifurcated molar roots to apply controlled rotational and lever force without impinging on the adjacent tooth or the lingual plate. As a result, this instrument has remained a standard extraction accessory across general dental clinics, oral surgery departments, teaching hospitals, and maxillofacial units worldwide for decades.
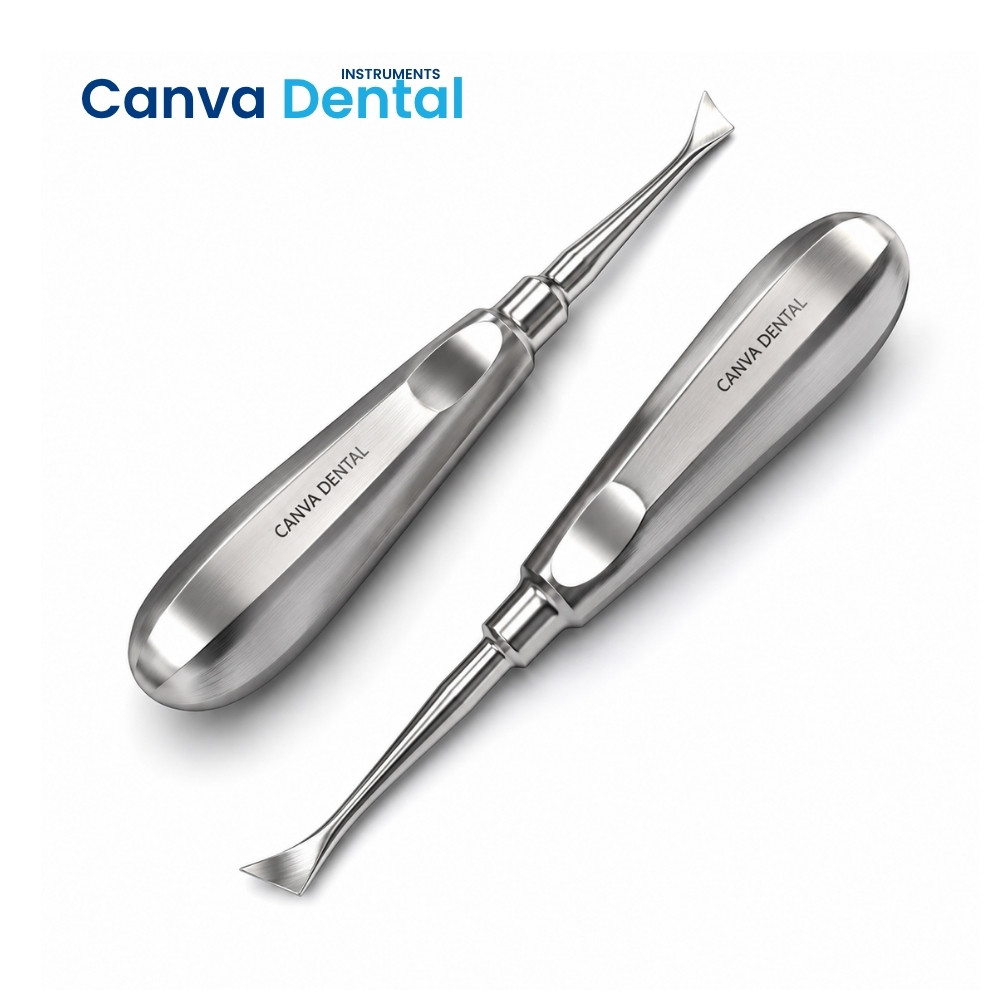
A Cryer Elevator dental instrument is a paired, triangular-bladed extraction elevator designed specifically to engage the inter-radicular bone septum between the roots of multi-rooted posterior teeth — primarily mandibular molars — and apply rotational lever force to elevate individual roots from their sockets after tooth sectioning or spontaneous root fracture during extraction. The instrument features a triangular, pointed working tip angled at approximately 45° to the shaft, allowing the blade to seat into the inter-radicular septum and use the adjacent bone as a fulcrum for controlled elevation.
Unlike straight elevators that apply force along a single linear axis, the Cryer root elevator works through a combination of rotational and wedging motion — the triangular tip rotates within the inter-radicular septum, progressively expanding the periodontal ligament space around the remaining root and driving it coronally out of the socket. Consequently, this technique allows controlled, atraumatic root removal without the uncontrolled force that straight instruments risk applying to the socket wall, the adjacent tooth, or the inferior alveolar nerve in the lower molar region.
The Cryer Elevator takes its name from the American surgeon who developed the paired triangular blade design for posterior root removal. The instrument exists as a mirror-image left-right pair because the angulation of the working tip must match the direction of inter-radicular access — the left elevator seats into the septum from one side, and the right elevator from the opposite side. Therefore, a complete Cryer Elevator set always includes both the left and right variants to cover all clinical extraction scenarios for mandibular and maxillary multi-rooted teeth.
Straight elevators — such as the Coupland and Warwick James instruments — apply force along the long axis of the root through a lever and wheel-and-axle mechanism. Although straight elevators work effectively on single-rooted teeth and accessible root surfaces, they cannot engage the inter-radicular septum between bifurcated roots where the Cryer Elevator excels. Moreover, straight elevators carry a higher risk of displacing a root fragment into the inferior alveolar canal when the root tip is inaccessible from the occlusal approach. The Cryer root elevator, by using the inter-radicular septum as a fixed fulcrum, generates its force from a stable, bone-supported position — reducing the risk of uncontrolled displacement significantly.
Specifically, every Cryer Elevator in our range incorporates these professional-grade surgical and material features:
The Cryer Elevator left and right pair represents one of the most clinically important design features of the instrument — and the most commonly misunderstood by students and junior clinicians encountering it for the first time. Each instrument in the pair is a mirror image of the other, with the triangular blade angled in opposite directions relative to the shaft.
The left Cryer Elevator seats its blade into the inter-radicular septum when approaching from one side of the arch; the right Cryer Elevator seats from the opposite angulation. Because the blade must make full, stable contact with the cortical bone of the septum to generate effective rotational force, using the wrong instrument from the pair results in the tip sitting at an angle that prevents proper seating — reducing mechanical advantage and increasing the risk of the instrument slipping off the septum onto the root or the adjacent tooth.
A reliable chairside rule for selecting the correct instrument: the concave face of the triangular blade should always face the root to be elevated. When the clinician holds the elevator with the cross-bar handle in the palm and positions the tip over the inter-radicular septum, the instrument whose concave blade face naturally contacts the target root is the correct selection for that approach. Furthermore, dental colleges and oral surgery training programs teach this selection rule as a fundamental extraction technique checkpoint — confirming correct instrument selection before applying any force prevents the most common Cryer Elevator technique error in both student and experienced clinician practice.
Dental teams use several different elevator designs across extraction procedures, and the Cryer Elevator occupies a specific functional niche within the broader dental root elevator category. Understanding how each elevator type differs helps clinicians select the most appropriate instrument for each extraction scenario:
| Elevator type | Blade design | Best for | Key difference vs Cryer |
|---|---|---|---|
| Cryer Elevator (L & R) | Triangular, 45° angled tip | Inter-radicular root elevation, molar roots | — |
| Coupland Elevator | Straight flat blade, 3 sizes | Single-rooted teeth, socket expansion | Linear force only; no inter-radicular access |
| Warwick James Elevator | Curved blade, left/right/straight | Curved roots, impacted canines | Curved access; not inter-radicular |
| Periosteal Elevator | Flat, broad working end | Mucoperiosteal flap reflection | Soft tissue use; not for root elevation |
| Luxator | Thin, sharp blade | PDL space entry, minimally invasive | Cuts PDL; does not use bone fulcrum |
| Apexo Elevator | Fine triangular tip | Root tip retrieval, apical fragments | Smaller tip for fine apical access only |
Therefore, the Cryer Elevator fills the specific clinical gap between straight elevators and fine apical instruments — it is the primary tool for removing individual roots after molar sectioning, and no other standard elevator design replicates its inter-radicular access geometry and rotational force mechanism.
Specifically, the full range of Cryer Elevator uses extends across multiple extraction and surgical scenarios in both general and specialist oral surgery practice. Dental teams rely on this instrument for the following clinical applications:
The Cryer root elevator addresses a specific anatomical challenge that makes lower molar extraction one of the highest-risk routine procedures in general dentistry — the proximity of bifurcated mandibular molar roots to the inferior alveolar nerve canal, the dense cortical bone of the mandibular body, and the limited inter-radicular access created by the furcation anatomy. When these factors combine with root curvature, hypercementosis, or dilaceration, straightforward forceps extraction becomes impossible without first separating and individually elevating the roots.
Without a correctly used Cryer Elevator, the clinician’s only alternatives are uncontrolled forceps force — which risks jaw fracture in elderly patients with atrophic mandibles — or extensive bone guttering with a surgical bur to access each root fragment individually. The Cryer Elevator reduces the need for either compromise by providing a controlled, bone-supported mechanical advantage point that allows progressive root loosening with minimal surrounding bone trauma to the socket.
Modern oral surgery training emphasises tooth sectioning as the standard approach for lower molar extraction whenever the roots are divergent, curved, or closely approximate the inferior alveolar canal on pre-operative radiographs. The Cryer Elevator is the natural partner instrument for sectioned molar removal — once the tooth is divided through the furcation, the elevator engages the exposed inter-radicular septum and systematically removes each root section with controlled, predictable force. Consequently, the Cryer Elevator and the surgical handpiece function as a coordinated instrument pair in difficult lower molar extraction, and both should always be present on the surgical tray before the procedure begins.
Several surgical elevator dental instruments exist for extraction procedures, and understanding how the Cryer Elevator compares to each alternative helps clinicians make sound instrument selection decisions before applying force in the surgical field:
| Instrument | Mechanism | Best for | Limitation vs Cryer Elevator |
|---|---|---|---|
| Cryer Elevator (L & R) | Rotational, inter-radicular septum fulcrum | Molar roots after sectioning, fractured root tips | — |
| Coupland No.1 / 2 / 3 | Lever, socket wall fulcrum | Single-rooted anterior and premolar teeth | Cannot access inter-radicular space |
| Warwick James (curved) | Lever and wheel-and-axle | Curved roots, maxillary canines | No rotational inter-radicular function |
| Luxator (thin blade) | PDL cutting, insertion force | Minimally invasive single-root loosening | Not designed for inter-radicular septum use |
| Apexo Elevator | Fine rotational tip | Apical root tip fragments only | Too fine for primary root elevation force |
Consequently, the Cryer Elevator occupies an irreplaceable position in the extraction instrument tray — it is the only standard paired elevator designed specifically for inter-radicular bone septum engagement and rotational root elevation after molar sectioning. No other instrument in the standard extraction set replicates this function with the same mechanical advantage and safety profile.
Before beginning the elevation sequence, confirm that both left and right Cryer Elevators are present on the surgical tray. Review the pre-operative periapical radiograph to assess root morphology, divergence, proximity to the inferior alveolar canal, and the width of the inter-radicular septum — all of which influence the force required and the approach direction. Administer adequate inferior alveolar nerve block anaesthesia and confirm profound anaesthesia before proceeding. If the tooth requires sectioning before elevation, complete the furcation section with a surgical bur under copious irrigation before selecting the Cryer Elevator for the root removal phase.
Because the Cryer Elevator contacts bone, periodontal ligament, and open socket tissue during every extraction procedure, correct sterilization between every patient is a clinical and regulatory requirement without exception. All stainless steel Cryer Elevators in our range withstand repeated autoclave cycles at 134°C in pre-vacuum steam sterilization and at 121°C in gravity displacement cycles — without corrosion, tip deformation, or handle loosening across their full clinical service life.
Moreover, ultrasonic pre-cleaning before autoclaving is essential for this tooth extraction elevator because blood, bone fragments, and periodontal ligament tissue lodge in the junction between the blade and the shank during surgical use. Place the instrument in an enzyme-based ultrasonic cleaning solution for 10–15 minutes immediately after use, before organic debris dries onto the metal surface. Rinse thoroughly, dry completely, then bag and autoclave as standard protocol.
However, always inspect the triangular blade tip before each procedure for blunting, deformation, or micro-cracks that indicate the working end requires replacement. A deformed or blunted Cryer Elevator tip fails to seat correctly in the inter-radicular septum — requiring greater force to achieve the same elevation effect and increasing the risk of instrument slippage and surgical trauma to the socket and adjacent structures. Our surgical-grade stainless steel Cryer Elevators maintain tip geometry and edge integrity across hundreds of sterilization cycles under standard clinical operating conditions.
Similarly, many dental professionals follow sterilization and infection control guidance recommended by the American Dental Association to maintain clinical safety and instrument integrity across all surgical procedure types.
Our Cryer Elevator range — including standard left-right pairs in surgical-grade stainless steel with cross-bar handles, T-bar handle variants, and institutional bulk sets for oral surgery departments — supplies general dental clinics, oral surgery departments, maxillofacial units, teaching hospitals, and dental instrument distributors across Lahore, Karachi, Islamabad, Multan, Peshawar, Faisalabad, Rawalpindi, and all major cities in Pakistan. Furthermore, oral surgery departments and dental college extraction clinics at the University of Health Sciences Lahore, Dow University of Health Sciences Karachi, Nishtar Medical University Multan, and Khyber Medical University Peshawar use our Cryer Elevator dental instruments as part of their standard surgical extraction tray setups. Because our instruments originate from Sialkot — Pakistan’s internationally recognised surgical instruments manufacturing hub — they carry the tip precision, material quality, and sterilization durability that institutional surgical buyers and international export clients consistently require.
Contact our team for current Cryer Elevator Pakistan pricing, available handle styles and set configurations, bulk order quotations for dental colleges and hospital oral surgery departments, and delivery timelines for your clinic or institution.
What is a Cryer Elevator used for in dentistry?
Specifically, the Cryer Elevator is a paired surgical extraction instrument that oral surgeons and general dentists use to elevate individual roots from the sockets of multi-rooted posterior teeth — primarily mandibular molars — after tooth sectioning or root fracture during extraction. The instrument’s triangular blade seats into the inter-radicular bone septum and applies controlled rotational force to loosen and deliver each root section.
What is the difference between Cryer Elevator left and right?
The left and right Cryer Elevators are mirror-image instruments — the triangular blade angulation is reversed between the two. In clinical use, the correct instrument is the one whose concave blade face naturally contacts the root to be elevated when the tip seats into the inter-radicular septum.
What are the main Cryer Elevator uses in oral surgery?
The primary Cryer Elevator uses include: individual root removal after molar sectioning through the furcation; fractured root tip elevation from the mandibular molar socket; pre-luxation of difficult lower molars before forceps application; maxillary molar root removal after surgical sectioning; and root removal after crown fracture at or below the gingival margin.
Is the Cryer Elevator available in Pakistan and what is the price?
Yes, Cryer Elevator Pakistan supply is available through our direct sales team and authorised dental instrument distributors in Lahore, Karachi, Islamabad, Multan, Peshawar, Faisalabad, and Rawalpindi. Its pricing is 550 to 1200 PKR
Can the Cryer Elevator be autoclaved?
Yes. All stainless steel Cryer Elevators in our range withstand autoclave sterilization at 134°C in pre-vacuum cycles. Furthermore, ultrasonic cleaning before each sterilization cycle is strongly recommended to remove bone debris, blood, and periodontal ligament tissue.
For complete oral surgery and extraction instrument setups, explore all dental instruments here: CLICK
Reviews
There are no reviews yet.